Understanding Clipping Paths: The Basics
A clipping path is essentially a closed vector path or shape that defines which parts of an image will be visible and which parts will be hidden or “cut out.” Think of it as using a digital version of scissors to carefully cut around an object in a photograph. The result? A precisely isolated subject that can be placed on any background without those awkward white edges or unwanted background elements.
Unlike other selection methods in Photoshop, clipping paths offer exceptional precision and clean edges—making them the preferred choice for professional product photography, catalog creation, and e-commerce listings where image consistency is crucial.
“Clipping paths are to digital photography what precision cutting tools are to traditional craftsmanship—they give you control over every curve and edge of your subject.”
When should you use a clipping path instead of other techniques? Generally, clipping paths work best for objects with defined, hard edges like furniture, electronics, shoes, and jewelry. For subjects with fuzzy edges like hair or fur, you might want to combine clipping paths with other techniques (more on that later).
Benefits of Using Clipping Paths
Incorporating clipping paths into your photo editing workflow offers several advantages:
- Professional-quality results: Creates clean, crisp edges that look natural even against different backgrounds
- Consistency across product lines: Ensures all your product images have the same look and feel
- Versatility: Allows for easy placement of your subject on any background
- Print-ready files: Creates images that work well for both digital and print media
- Time efficiency: Once mastered, creating paths can be faster than pixel-based selections for certain objects
E-commerce businesses particularly benefit from quality clipping paths. In fact, studies show that consistent, professional product images can increase conversion rates by up to 30%. That’s a significant boost simply from having clean, well-executed product photos!
Essential Photoshop Tools for Creating Clipping Paths
Before diving into the process, let’s familiarize ourselves with the main tools you’ll be using:
The Pen Tool: Your Best Friend
The Pen Tool (P) is the star of the show when creating clipping paths. It allows you to create precise anchor points connected by segments that can be straight or curved. While it might seem intimidating at first, mastering the Pen Tool is worth the effort.
Supporting Cast
- Path Selection Tool (A): Helps you select and move entire paths
- Direct Selection Tool (A): Lets you select and adjust individual anchor points
- Convert Point Tool: Transforms corner points to smooth curves and vice versa
A quick tip: Press and hold the Ctrl key (Command on Mac) while using the Pen Tool to temporarily access the Direct Selection Tool—this saves time when making adjustments to your path.
Step-by-Step Guide to Creating a Basic Clipping Path
Let’s walk through creating your first clipping path:
1. Prepare Your Workspace
Open your image in Photoshop and zoom in to a comfortable level (try 100-200% to start). Make sure your Paths panel is visible (Window > Paths).
2. Select the Pen Tool
Choose the Pen Tool from the toolbar or press P on your keyboard.
3. Start Creating Your Path
Click to create your first anchor point on the edge of your subject. Continue placing points by clicking around the outline of your object:
- For straight lines: Simply click from point to point
- For curves: Click and drag to create handles that shape the curve
4. Complete Your Path
When you’ve traced the entire object, close the path by clicking on your starting point. You’ll see a small circle appear next to your cursor when you’re hovering over the first point, indicating that clicking will close the path.
5. Save Your Path
In the Paths panel, double-click on “Work Path” and give your path a name to save it.
6. Create a Selection From Your Path
Right-click on your saved path in the Paths panel and choose “Make Selection.” Use a feather radius of 0 for crisp edges.
7. Apply Your Selection
Now you can:
- Press Ctrl+J (Cmd+J) to copy the selected area to a new layer
- Add a layer mask to hide everything outside your selection
- Export your image with transparency
For product photos, the most common next step is to place your isolated subject on a clean white or transparent background.
Advanced Clipping Path Techniques
Once you’ve mastered the basics, you can level up your skills with these advanced techniques:
Working with Complex Objects
For items with intricate details:
- Zoom in closer (300-400%)
- Use fewer anchor points but position them strategically
- Adjust handles to follow natural curves
- Consider using multiple paths for very complex objects
Compound Paths for Internal Details
Some objects have holes or internal areas that need to be transparent (like the handle of a mug). For these:
- Create your main outline path
- Create a separate path for the internal area
- In the Paths panel, select both paths
- Click on “Combine Paths” in the panel options
Using Clipping Paths with Adjustment Layers
One of the most powerful applications is using your path to create targeted adjustments:
- Create and save your clipping path
- Make a selection from the path
- Add an adjustment layer (like Curves or Hue/Saturation)
- The adjustment will automatically apply only to your selected area
This technique is particularly useful for product photographers who need to enhance specific parts of an item without affecting the whole image.
Common Mistakes and How to Avoid Them
As you practice creating clipping paths, watch out for these common pitfalls:
Too Few Anchor Points
Problem: Path doesn’t follow the object’s contours accurately Solution: Add more points at areas where the shape changes direction
Too Many Anchor Points
Problem: Path becomes jagged and unnatural Solution: Use fewer points but position them at key changes in direction, letting the handles do the work of creating smooth curves
Improper Handle Management
Problem: Curves look unnatural or have sharp kinks Solution: Adjust handle length and direction to create smooth transitions
Forgetting to Close Your Path
Problem: The selection won’t work properly Solution: Always make sure to click on your starting point to close the path
Remember that practice makes perfect. Even professional photo editors started somewhere!
Clipping Path vs. Other Masking Techniques
While clipping paths are powerful, they’re not always the best choice for every situation. Here’s a quick comparison:
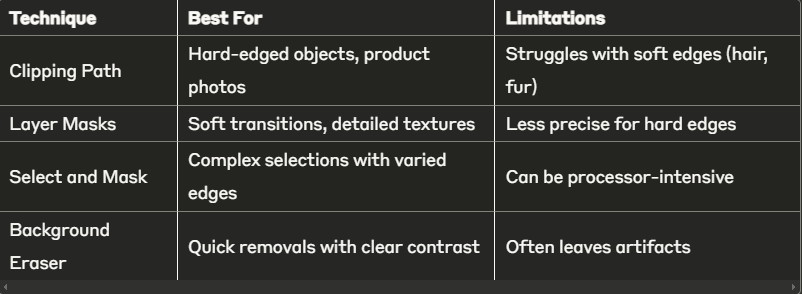
Photoshop 2025 has introduced improvements to the Select Subject and Object Selection tools, which can create an initial selection that you can refine with the Pen Tool—combining the best of both worlds.
Clipping Path Best Practices for E-commerce
If you’re working on product photos for an online store, follow these best practices:
Consistency is Key
Establish standards for all your product images:
- Same path precision level
- Consistent shadows (if any)
- Uniform cropping and spacing
Quality Control Checklist
Before finalizing any clipping path:
- Check for stray pixels at 200% zoom
- Ensure smooth curves at corners and edges
- Verify that all necessary details are included
- Test the image against different backgrounds
Batch Processing for Efficiency
For similar products:
- Create a “template” path for the first item
- Save it as a work path
- Load and adjust it for similar items
- Use Photoshop’s batch processing features for applying the same actions to multiple images
New Clipping Path Features in Photoshop 2025
Photoshop continues to evolve, and the 2025 version offers several enhancements that make clipping paths more efficient:
AI-Assisted Path Creation
The new Smart Path feature can suggest optimal anchor point placement as you work, learning from your style and improving over time.
Enhanced Path Refinement
The Refine Path tool now offers more precise control over curved segments, making it easier to follow complex shapes.
Cloud Integration
Your paths can now be saved to Creative Cloud and accessed across devices, allowing for seamless workflow between desktop and tablet versions of Photoshop.
DIY vs. Professional Clipping Path Services
Should you create clipping paths yourself or outsource them? Consider these factors:
When to DIY:
- You have a small number of images
- You have time to develop the skill
- You need complete control over the process
- Your images have relatively simple subjects
When to Consider Professional Services:
- You have hundreds or thousands of product images
- You need fast turnaround
- Your products have complex details
- Consistency across large catalogs is crucial
Professional services like ours at PhotoEditsLab can handle large volumes with consistent quality, often at a lower cost-per-image than handling it in-house when you factor in time spent.
Conclusion: Mastering the Art of Clipping Paths
Creating perfect clipping paths is both a technical skill and an art form. With practice, you’ll develop an eye for where to place anchor points and how to shape curves that follow your subject perfectly.
Remember that even experts were beginners once. Start with simpler objects and gradually take on more complex challenges as your confidence grows. The time invested in learning this skill will pay dividends in the quality of your images.
Whether you’re a photographer looking to elevate your product shots, an e-commerce store owner wanting to improve your product listings, or a graphic designer adding to your skillset, mastering clipping paths will give you more control over your visual content.
Need help with your clipping path projects? At PhotoEditsLab, we offer professional clipping path services for businesses of all sizes, with fast turnaround times and competitive pricing. Contact us to learn how we can help bring your product images to the next level!
Frequently Asked Questions
Q: How long does it take to create a good clipping path? A: For beginners, a simple object might take 10-15 minutes. With practice, that same object might take only 2-3 minutes. Complex objects with many details can take experienced editors 15-30 minutes.
Q: Can I create clipping paths in software other than Photoshop? A: Yes, vector programs like Adobe Illustrator and Affinity Designer also offer path creation tools. However, Photoshop remains the industry standard for photo-specific clipping path work.
Q: What’s the difference between a clipping path and a layer mask? A: A clipping path is a vector-based outline that defines what’s visible, while a layer mask uses pixel-based data to control visibility. Clipping paths excel at hard edges, while layer masks handle soft transitions better.
Q: How much should I expect to pay for professional clipping path services? A: Pricing typically ranges from $0.50 to $10 per image, depending on complexity. Basic paths for simple objects are on the lower end, while intricate items with multiple paths cost more.
Q: Can clipping paths be automated for large batches of similar products? A: Partial automation is possible with action recording and batch processing, but quality clipping paths generally require some human oversight, especially for products with variations.